
My journey began in December 2024, when I started exploring the potential of LLMs, LangChain, and LangGraph to harness the power of AI-driven agents. The goal was clear: leverage the strengths of LLM agents to elevate the capabilities of my software solutions. This quest opened the door to understanding how these tools could enable complex workflows, integrate with external systems, and create dynamic, adaptable software architectures.
In this post, I’ll introduce you to LangGraph, an orchestration framework I’ve been working with, and showcase how it can be used to build agent workflows with powerful state management and fine-tuned control. Whether you’re a developer seeking to incorporate LLM agents into your projects, or simply curious about the potential of AI-driven software, I hope this post offers valuable insights to fuel your own journey.
Introduction to LangGraph: Basics and Examples
LangGraph is a stateful orchestration framework for building multi-actor applications with Large Language Models (LLMs). It enables creating complex agent workflows with cycles and branching, essential for agentic architectures. LangGraph provides fine-grained control over application flow and state for building reliable agents, while also offering built-in persistence for advanced memory and human-in-the-loop workflows.
Key features include:
- Cycles and Branching: Enable loops and conditionals in workflows.
- Persistence: Save state after each graph step, allowing workflows to pause and resume.
- Human-in-the-Loop: Pause execution for approvals or edits of planned actions.
- Streaming Support: Stream outputs in real time, including token-level outputs.
- LangChain Integration: Works seamlessly with LangChain and LangSmith or as a standalone tool.
It models agent workflows as graphs, where you define the behavior of your agents using three key components:
- State: A shared data structure that represents the current snapshot of your application. It can be any Python type, but is typically a TypedDict or Pydantic BaseModel.
- Nodes: Python functions that encode the logic of your agents. They receive the current State as input, perform some computation or side-effect, and return an updated State.
- Edges: Python functions that determine which Node to execute next based on the current State. They can be conditional branches or fixed transitions.
Example 1: Graph With Single Node
LangGraph’s state management system is a core feature that ensures data flows seamlessly between nodes. Let’s explore how state is handled in a simple graph using a single node.

Code Example:
					from langgraph.graph import StateGraph, START, END
from typing import List
from typing_extensions import TypedDict

# Define the structure of the state
class State(TypedDict):
    messages: List[str]
    count: int

# Create the graph
def create_graph():
    graph_builder = StateGraph(State)

    # Define a single node
    def node1(state: State) -> State:
        state["messages"] = state["messages"] + ["Hello from node 1"]
        state["count"] += 1
        return state

    # Add the node to the graph
    graph_builder.add_node("node1", node1)

    # Define the flow of the graph
    graph_builder.add_edge(START, "node1")
    graph_builder.add_edge("node1", END)

    # Compile the graph
    graph = graph_builder.compile()
    return graph

# Initialize the graph and input state
graph = create_graph()
input_state = {"messages": ["Hi from user"], "count": 0}

# Invoke the graph
response_state = graph.invoke(input_state)
print(response_state)
Output:
					{
'messages': ['Hi from user', 'Hello from node 1'],
'count': 1
}
Explanation:
- State Definition: The State class defines the structure of the state, including messages and count.
- Node Logic: The node1 function takes the input state, appends a message, increments the count, and returns the updated state.
- Graph Flow: The graph starts at the START node, processes through node1, and ends at the END node.
- Result: The graph modifies the input state as it flows through node1.
Example 2: Graph With Two Nodes Connected Sequentially
In this example, we expand on the first one by adding a second node that sequentially processes the state. This demonstrates how multiple nodes work together in a flow, passing the updated state from one to the next.

Code Example:
					from langgraph.graph import StateGraph, START, END
from typing import List
from typing_extensions import TypedDict

# Define the structure of the state
class State(TypedDict):
    messages: List[str]
    count: int

# Create the graph
def create_graph():
    graph_builder = StateGraph(State)

    # Define the first node
    def node1(state: State) -> State:
        state["messages"] = state["messages"] + ["Hello from node 1"]
        state["count"] += 1
        return state

    # Define the second node
    def node2(state: State) -> State:
        state["messages"] = state["messages"] + ["Hello from node 2"]
        state["count"] += 1
        return state

    # Add the nodes to the graph
    graph_builder.add_node("node1", node1)
    graph_builder.add_node("node2", node2)

    # Define the flow of the graph
    graph_builder.add_edge(START, "node1")
    graph_builder.add_edge("node1", "node2")
    graph_builder.add_edge("node2", END)

    # Compile the graph
    graph = graph_builder.compile()
    return graph

# Initialize the graph and input state
graph = create_graph()
input_state = {"messages": ["Hi from user"], "count": 0}

# Invoke the graph
response_state = graph.invoke(input_state)
print(response_state)
Output:
					{
'messages': ['Hi from user', 'Hello from node 1', 'Hello from node 2'],
'count': 2
}
Explanation:
- Multiple Nodes: The graph now includes two nodes (node1 and node2), each modifying the state.
- State Flow: After node1 updates the state, node2 processes it further. The flow is sequential.
- Graph Flow: The graph starts at START, processes through node1, then node2, and ends at END.
- Result: The final state includes messages from both nodes, and the count is incremented twice, showing how state flows across multiple nodes.
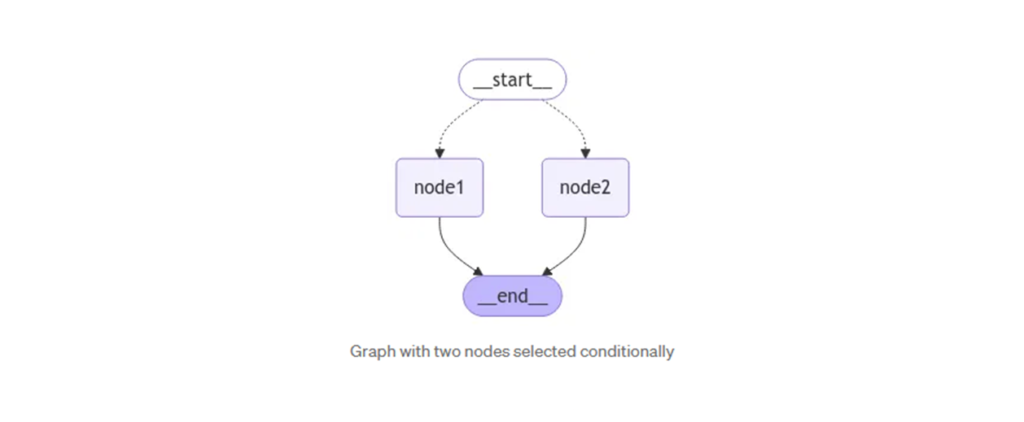
Example 3: Graph with Two Nodes Selected Conditionally
In this example, we explore how to use conditional logic to select between multiple nodes based on the state. This is a useful technique when the next step in the workflow depends on a dynamic condition, such as a user input or a previously computed result.
Here, we have a graph with two nodes (node1 and node2). The choice of which node to execute next is determined by the value of the use_node field in the state.
Code Example:
					from langgraph.graph import StateGraph, START, END
from typing import List
from typing_extensions import TypedDict

# Define the structure of the state
class State(TypedDict):
    messages: List[str]
    use_node: str
    count: int

# Create the graph
def create_graph():
    graph_builder = StateGraph(State)

    # Define the first node
    def node1(state: State) -> State:
        state["messages"] = state["messages"] + ["Hello from node 1"]
        state["count"] += 1
        return state

    # Define the second node
    def node2(state: State) -> State:
        state["messages"] = state["messages"] + ["Hello from node 2"]
        state["count"] += 1
        return state

    # Conditional router to decide which node to use
    def conditional_router(state: State) -> str:
        if state["use_node"] == "node1":
            return "node1"
        else:
            return "node2"

    # Add the nodes to the graph
    graph_builder.add_node("node1", node1)
    graph_builder.add_node("node2", node2)

    # Add a conditional edge based on the `use_node` value
    graph_builder.add_conditional_edges(START, conditional_router,{"node1":"node1","node2":"node2"})
    graph_builder.add_edge("node1", END)
    graph_builder.add_edge("node2", END)

    # Compile the graph
    graph = graph_builder.compile()
    return graph

# Initialize the graph and input state
graph = create_graph()
input_state = {"messages": ["Hi from user"], "use_node": "node2", "count": 0}

# Invoke the graph
response_state = graph.invoke(input_state)
print(response_state)
Output:
					{
'messages': ['Hi from user', 'Hello from node 2'],
'use_node': 'node2',
'count': 1
}
Explanation:
- Conditional Node Selection: The graph now includes a conditional_router function that checks the value of use_node in the state. If use_node is “node1“, the flow proceeds to node1; otherwise, it moves to node2.
- Node Logic: node1 adds a message to the messages list and increments the count.node2 performs similar actions but appends a different message to messages.
- Conditional Flow: The START node’s edge is now conditional, determined by the conditional_router. Depending on the use_node value, either node1 or node2 is selected, and the flow continues to END.
- Result: Since the input state specifies “use_node“: “node2“, the graph processes through node2, adding its message and incrementing the count.
Example 4: Graph with Nodes Connected in Parallel
In this example, we explore how to execute multiple nodes in parallel. This technique is useful when different parts of your workflow can run simultaneously without affecting each other’s results. By connecting multiple nodes in parallel, you can increase the efficiency and flexibility of your agent workflows.
Here, we have four nodes (node1, node2, node3, and node4). The graph is structured such that node1 runs first, followed by both node2 and node3 in parallel, and finally node4, which collects the results from both parallel nodes.

Code Example:
					from langgraph.graph import StateGraph, START, END
from typing import List, Annotated
from typing_extensions import TypedDict

# Helper functions to demonstrate state manipulation
def add_messages(left, right):
    return left + right
def add_count(left, right):
    return left + right

# Define the structure of the state
class State(TypedDict):
    messages: Annotated[List[str], add_messages]
    count: Annotated[int, add_count]

# Create the graph
def create_graph():
    graph_builder = StateGraph(State)

    # Define the first node
    def node1(state: State) -> State:
        print("Entered Node 1 with State: " + str(state))
        state["messages"] = ["Hello from node 1"]
        state["count"] = 1
        return state

    # Define the second node
    def node2(state: State) -> State:
        print("Entered Node 2 with State: " + str(state))
        state["messages"] = ["Hello from node 2"]
        state["count"] = 1
        return state

    # Define the third node
    def node3(state: State) -> State:
        print("Entered Node 3 with State: " + str(state))
        state["messages"] = ["Hello from node 3"]
        state["count"] = 1
        return state

    # Define the fourth node
    def node4(state: State) -> State:
        print("Entered Node 4 with State: " + str(state))
        state["messages"] = ["Hello from node 4"]
        state["count"] = 1
        return state

    # Add the nodes to the graph
    graph_builder.add_node("node1", node1)
    graph_builder.add_node("node2", node2)
    graph_builder.add_node("node3", node3)
    graph_builder.add_node("node4", node4)

    # Define parallel edges
    graph_builder.add_edge(START, "node1")
    graph_builder.add_edge("node1", "node2")
    graph_builder.add_edge("node1", "node3")
    graph_builder.add_edge("node2", "node4")
    graph_builder.add_edge("node3", "node4")
    graph_builder.add_edge("node4", END)

    # Compile the graph
    graph = graph_builder.compile()
    return graph

# Initialize the graph and input state
graph = create_graph()
input_state = {"messages": ["Hi from user"], "count": 0}

# Invoke the graph
response_state = graph.invoke(input_state)
print("Output State: " + str(response_state))
Output:
					Entered Node 1 with State: {'messages': ['Hi from user'], 'count': 0}
Entered Node 2 with State: {'messages': ['Hi from user', 'Hello from node 1'], 'count': 1}
Entered Node 3 with State: {'messages': ['Hi from user', 'Hello from node 1'], 'count': 1}
Entered Node 4 with State: {'messages': ['Hi from user', 'Hello from node 1', 'Hello from node 2', 'Hello from node 3'], 'count': 3}
Output State: {'messages': ['Hi from user', 'Hello from node 1', 'Hello from node 2', 'Hello from node 3', 'Hello from node 4'], 'count': 4}
Explanation:
1. Parallel Execution:
- The graph starts with node1, which processes the initial state.
- After node1 completes, the flow splits into two parallel paths: node2 and node3. These nodes execute independently and concurrently.
- Once both node2 and node3 finish, the flow merges into node4, where all the results are consolidated.
2. Node Logic:
- Each node appends a message to the messages list and updates the count. The print statements help track the state as it flows through the graph.
3. Graph Flow: The graph follows this path:
- START → node1 → node2 and node3 (in parallel) → node4 → END
4. Result:
- The final state shows that all messages from the nodes are accumulated, and the count is incremented as expected. The final state includes the messages from all nodes, and the count is 4 (as node1, node2, node3, and node4 each contribute 1 to the count).
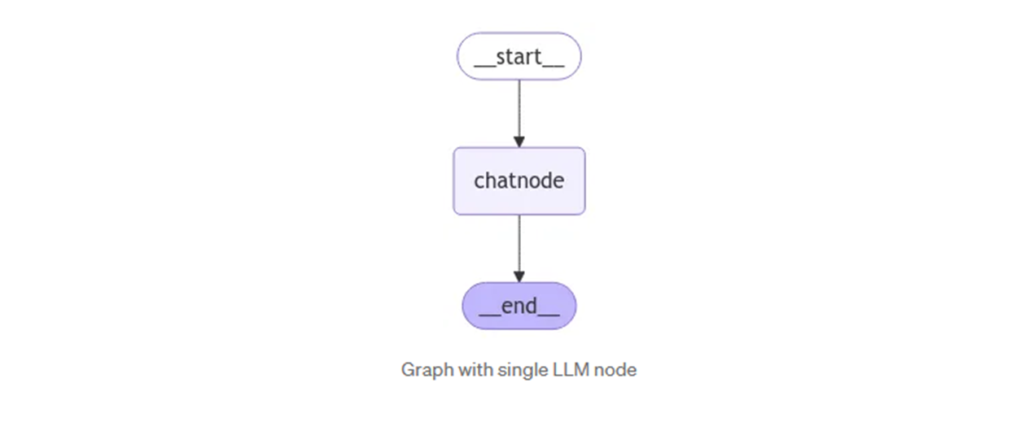
Example 5: Graph with a Single LLM Node
This example demonstrates how to integrate a Large Language Model (LLM) into a LangGraph workflow. By adding a single LLM node, we can process user queries and generate AI responses.
By leveraging LangChain’s prompt template and LangGraph’s state management, developers can build powerful applications with minimal effort.
Code Example:
					from langgraph.graph import StateGraph, START, END
from langgraph.graph.message import AnyMessage, add_messages
from typing import Annotated, List
from typing_extensions import TypedDict
from langchain_groq import ChatGroq
from langchain.prompts import ChatPromptTemplate, MessagesPlaceholder

# Define the structure of the state
class State(TypedDict):
    messages: Annotated[List[AnyMessage], add_messages]

# Initialize the LLM with a prompt
def get_llm():
    prompt_template = ChatPromptTemplate.from_messages([
        ("system", "You are an AI Assistant, respond to user question in 10 words"),
        MessagesPlaceholder("message_history"),
        ("user", "{input}")
    ])
    llm = ChatGroq(model="llama3-70b-8192", temperature=1, api_key="Paste your Groq API key")
    llm_with_prompt = prompt_template | llm
    return llm_with_prompt

# Create the graph
def create_graph():
    graph_builder = StateGraph(State)

    # Define the LLM node
    def ChatNode(state: State) -> State:
        last_message = state["messages"][-1]
        message_history = state["messages"][:-1]
        llm = get_llm()
        state["messages"] = llm.invoke({"input": last_message.content, "message_history": message_history})
        return state

    # Add the LLM node to the graph
    graph_builder.add_node("chatnode", ChatNode)
    graph_builder.add_edge(START, "chatnode")
    graph_builder.add_edge("chatnode", END)

    # Compile the graph
    graph = graph_builder.compile()
    return graph

# Initialize the graph and input state
graph = create_graph()
input_state = {"messages": ["Who are you?"]}

# Invoke the graph
response_state = graph.invoke(input_state)
print(response_state)
Output:
					{
    'messages':
    [
        HumanMessage(content='Who are you?', additional_kwargs={}, response_metadata={}, id='...'),
        AIMessage(content='I am LLaMA, an AI assistant, here to help you.', additional_kwargs={}, response_metadata={...},id='...', usage_metadata={...})
    ]
}
Explanation:
- LLM Initialization: The get_llm function sets up an LLM with a predefined prompt and integrates it into LangGraph using ChatPromptTemplate.
- LLM Node Logic: The ChatNode function extracts the latest user message and message history from the state, invokes the LLM, and updates the state with the AI-generated response.
- Graph Flow: The graph starts at START, processes through the ChatNode, and ends at END.
- State Updates: The final state includes the user query (HumanMessage) and the AI’s response (AIMessage), showcasing seamless integration of an LLM.
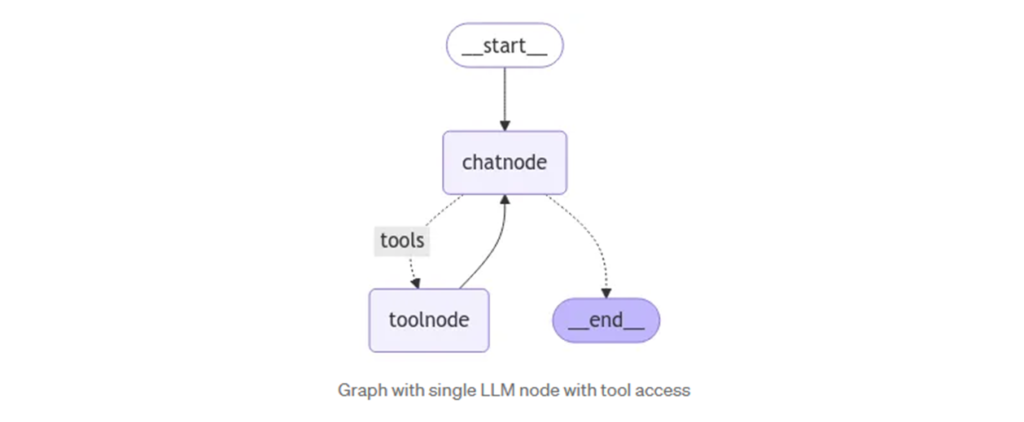
Example 6: Graph with Single LLM Node Having Access to Tools
In this example, The LLM node will have access to a custom tool (multiply_tool) to compute multiplication. This demonstrates how LangGraph can orchestrate agent workflows with external tools.
This example expands LangGraph’s functionality by incorporating tools within the workflow, demonstrating how LangGraph integrates LLM models and custom tools for more dynamic and intelligent agent behavior.
Code Example:
					from langgraph.graph import StateGraph, START, END
from langgraph.graph.message import AnyMessage, add_messages
from typing import Annotated, List
from typing_extensions import TypedDict
from langchain_groq import ChatGroq
from langchain.prompts import ChatPromptTemplate, MessagesPlaceholder
from langchain_core.tools import tool
from langgraph.prebuilt import ToolNode, tools_condition

# Define the structure of the state
class State(TypedDict):
    messages: Annotated[List[AnyMessage], add_messages]

# Define the multiply tool
@tool
def multiply_tool(a: float, b: float) -> float:
    """Use this tool to multiply 2 numbers"""
    print("<<<<<<<<<using multiply tool>>>>>>>>>>>")
    return a * b

# Get LLM with tool integration
def get_llm():
    prompt_template = ChatPromptTemplate.from_messages([
        ("system", """You are an AI Assistant, respond to user questions in 10 words.
        Use multiply tool to compute multiplication of numbers.
        For all other questions, answer directly."""),
        MessagesPlaceholder("messages")
    ])
    llm = ChatGroq(model="llama3-70b-8192", temperature=1, api_key="paste your groq api key here")
    llm_with_tool = llm.bind_tools(tools=[multiply_tool])
    llm_with_prompt = prompt_template | llm_with_tool
    return llm_with_prompt

# Create the LangGraph workflow
def create_graph():
    graph_builder = StateGraph(State)

    # Define the LLM node
    def ChatNode(state: State) -> State:
        llm = get_llm()
        state["messages"] = llm.invoke({"messages":state["messages"]})
        return state

    # Add nodes and edges to the graph
    graph_builder.add_node("chatnode", ChatNode)
    graph_builder.add_node("toolnode", ToolNode(tools=[multiply_tool]))
    graph_builder.add_edge(START, "chatnode")
    graph_builder.add_conditional_edges("chatnode", tools_condition, {"tools": "toolnode", "__end__": END})
    graph_builder.add_edge("toolnode", "chatnode")

    # Compile the graph
    graph = graph_builder.compile()
    return graph

# Initialize the graph
graph = create_graph()

# Test cases
print("======================Not using tool=========================")
input_state1 = {"messages": ["Who are you?"]}
response_state1 = graph.invoke(input_state1)
print(response_state1)

print("======================Using tool=========================")
input_state2 = {"messages": ["What is 2*3?"]}
response_state2 = graph.invoke(input_state2)
print(response_state2)
Output:
					======================Not using tool=========================
{
    'messages': [
        HumanMessage(content='Who are you?', additional_kwargs={}, response_metadata={}, id='...'),
        AIMessage(content='I am an AI Assistant.', additional_kwargs={}, response_metadata={...}, id='...', usage_metadata={...})
    ]
}
======================Using tool=========================
<<<<<<<<<using multiply tool>>>>>>>>>>>
{
    'messages': [
        HumanMessage(content='What is 2*3?', additional_kwargs={}, response_metadata={}, id='...'),
        AIMessage(content='', tool_calls=[{'name': 'multiply_tool', 'args': {'a': 2, 'b': 3}, 'id': 'call_7c9t', 'type': 'tool_call'}], additional_kwargs={...}, response_metadata={...}, id='...', usage_metadata={...}),
        ToolMessage(content='6.0', name='multiply_tool', id='...', tool_call_id='call_7c9t'),
        AIMessage(content='The answer is 6.0.', additional_kwargs={}, response_metadata={...}, id='...', usage_metadata={...})
    ]
}
Explanation:
- Tool Integration: We use the multiply_tool to perform calculations within the workflow. The tool is invoked only when the LLM determines the user’s question is related to multiplication.
- LLM Configuration: The get_llm function configures a LLM model and binds the tool to it. The model uses a custom prompt template to handle user queries.
- Graph Workflow: The graph begins with the ChatNode that processes user input through the LLM. If the user’s query is related to multiplication (like “What is 2*3?”), the ToolNode invokes the multiply_tool. The graph then loops back to process further messages, showing the dynamic interaction between nodes and tools.
- Output: When no tool is needed, the LLM responds directly. When the tool is required, the multiply_tool performs the calculation, and the LLM uses the tool’s result in the response.